
Funko to Filament: Can AI Turn a Portrait Into a 3D Print?
My wife likes funko-style dolls, so I asked GPT to draw her as one. The image took a few minutes and it looks like her.
Then I wanted the object, not the picture. That is where the easy part ends: the image and even the 3D mesh are now the cheap steps, and the expensive step is making that mesh printable.
This is a research log, written before the print. I have not printed the figurine, and I ran none of these tools. Every number below belongs to the vendor or publication that reported it, and I say who that is each time.
The portrait on my desk
I own and build this site and the AI Maker Lab channel — this is a build log, not an independent review. The picture was the easy half of this project.
My printer sits two metres from the desk where that portrait now lives on a screen. Between the two there is a pipeline nobody advertises: a mesh has to be closed, thick enough, connected, and sized in millimetres before a slicer will accept it. Tripo, one of the vendors in this field, puts the split plainly in its own print guide: “Generation invents shape; print readiness is a second job.”
So this article maps the second job. It covers what the image step gives you, which tools turn one image into a mesh, what each one exports, which of them run on the machine you already own, and what has to be repaired before printing.
What GPT actually gives you
The image step is well documented by makers who have already done it. Adafruit’s AI figure guide uploads a reference photo to ChatGPT and asks for a plastic action-figure render. Its own note is encouraging: “A simple picture of a bust was enough to generate a full body render.”
The guide also carries the one hard rule of the image step: “Make sure all body parts are visible to ensure a printable figure is generated.” The 3D step reconstructs what the picture shows, so anything hidden is anything missing.
When the image model fuses a limb, the documented fix is another prompt pass on the image, not a repair in 3D. In the guide’s own case the hand would not separate from a circuit board, so the author added “remove board from hand” to the prompt and generated again.
That is the whole image stage: one photo in, one clean full-body figure image out, with every limb showing.
From pixels to polygons
Image-to-3D tools reconstruct geometry from the picture you give them rather than inventing it from words. According to 3DPrinting.com’s 2026 roundup, two families of pipeline dominate: some tools generate several consistent 2D views and then reconstruct geometry from those, while others diffuse directly in a 3D space, “which tends to give more coherent shapes”. The same page notes that image-to-3D “reconstructs from what you actually show it and is usually more accurate and more printable” than text-to-3D.
What comes out is a file, and the file format decides what happens next. GLB and OBJ carry the textured mesh, STL is the universal print format, and 3MF is the print format that also stores units and settings.
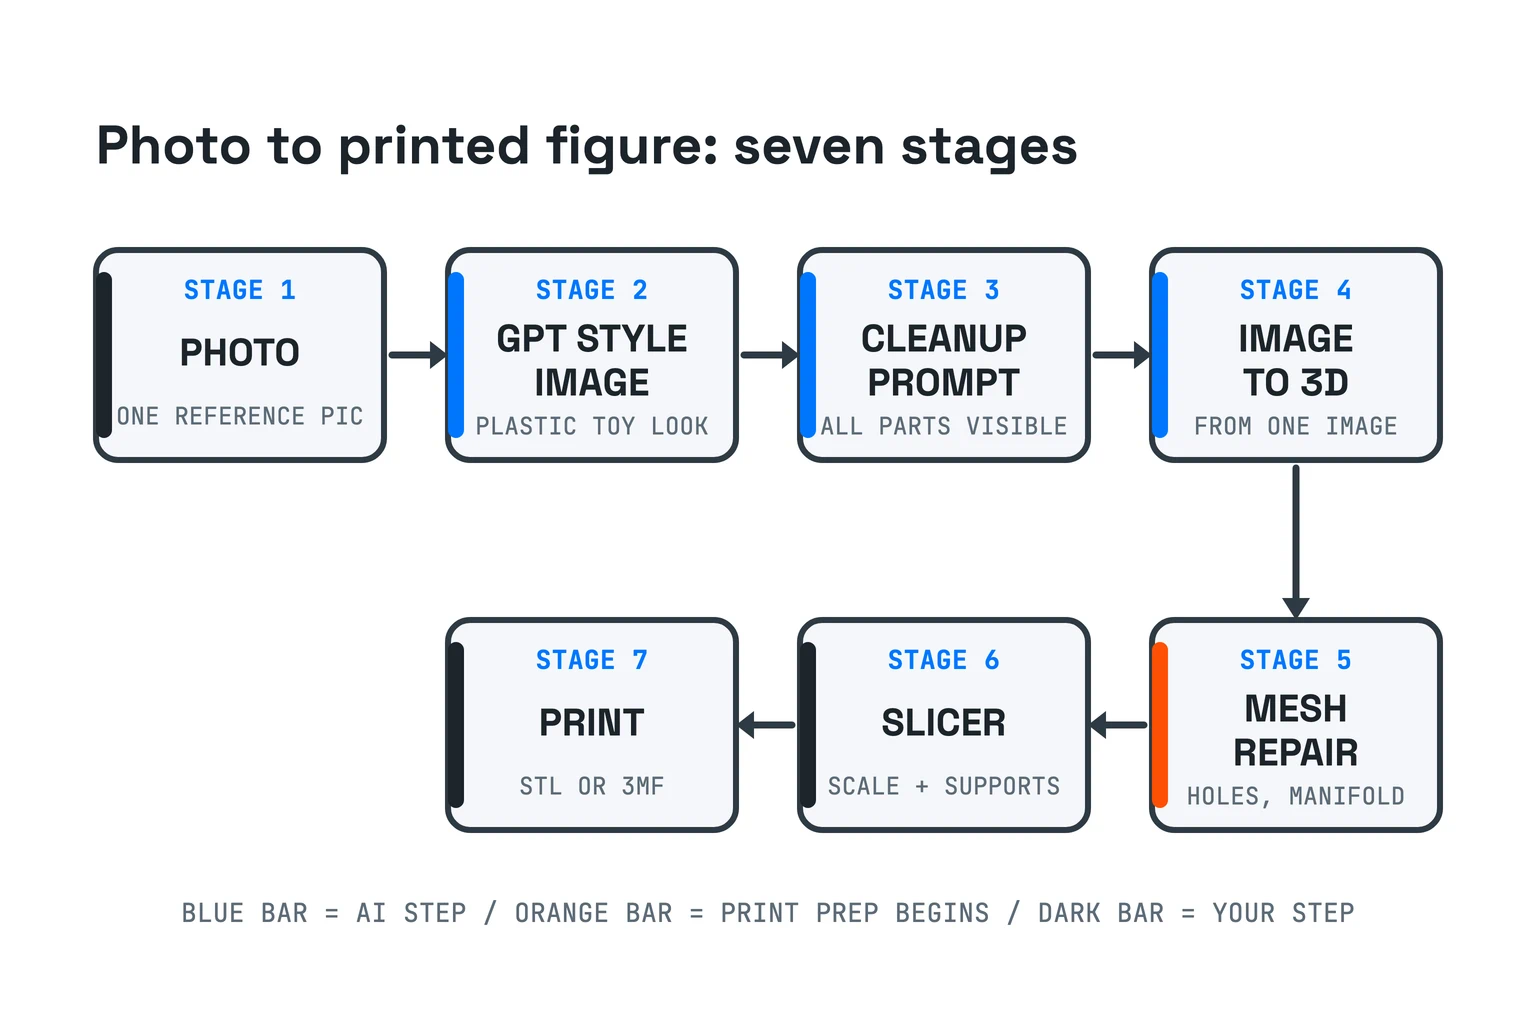
The stages after the mesh are the subject of the rest of this article.
The hosted services and what each one claims
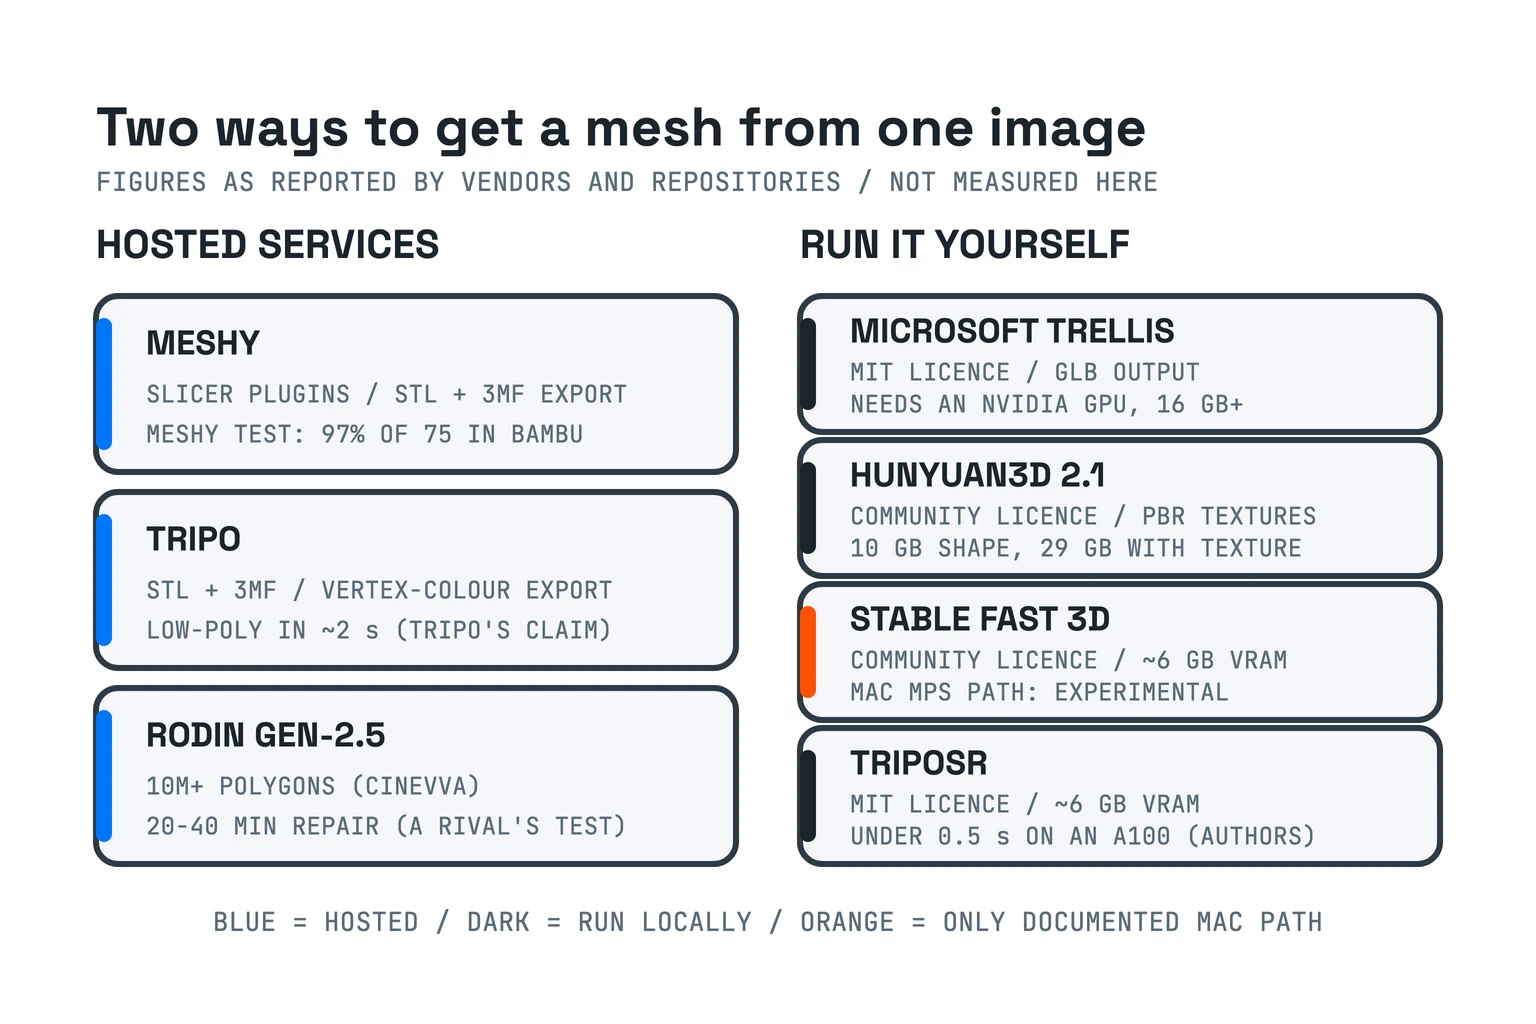
Three hosted services show up in all five comparisons I read for this article, and four of those five are published by companies that sell a generator of their own, so read every ranking in them accordingly. None of the figures below is mine.
Meshy is the one that most openly courts printing. 3DPrinting.com reports that it ships export plugins for Bambu Studio, OrcaSlicer, Cura, Creality Print, Elegoo Slicer and Lychee, so a generation lands more or less straight in a slicer. Its own 3D printing documentation states the workflow as “Generate → Check & Repair → Scale → Export STL/3MF → Slice → Print”, and its printability check targets “non-manifold edges, degenerate faces, holes and open boundaries” — non-manifold meaning an edge or face that cannot bound a solid. In Meshy’s own published testing of five tools, its character and figurine models reached “a 97% slicer pass rate with Bambu Studio” across 75 models, with 55% fully watertight on export. That is a vendor measuring itself, so read it as a claim, not a result.
Tripo competes on topology and speed. It exports STL and 3MF directly, and its own comparison claims its Smart Mesh produces clean low-poly topology “in about 2 seconds, while Meshy takes 5–8 minutes and Rodin about 15 minutes for complex low-poly workflows”. Again: that is Tripo describing Tripo and its rivals, with no protocol published.
Rodin Gen-2.5 is the detail extreme. Cinevva, whose 2026 guide also promotes its own hosted generator, reports “sculpt-level detail up to 10 million-plus polygons” (read 2026-08-25). Meshy’s competitive testing says the printing bill for that detail is real: Rodin’s “STL exports frequently require substantial repair for non-manifold edges” and add “20–40 minutes of Blender repair to every model”. One rival measuring another is the weakest kind of number here, and it is the only figure available. The sources do not even agree on what Rodin exports: RapidDirect’s table lists GLB and FBX with no print format, while Meshy’s comparison discusses repairing Rodin STL files, so check the current export list before subscribing.
Pricing is metered and the sources disagree. 3DPrinting.com reports Meshy’s free tier at “roughly 100 credits a month (about 10 assets) under a non-commercial license” with Pro “at ~$20/mo”, while Meshy’s own comparison table lists Pro at $14.50 a month. Tripo advertises a free tier of “200 credits/month, up to 8 models”. Rodin, per the same roundups, is free to generate and charges to download. I read all of those pages on 2026-08-25, and metered pricing moves.
Run it on your own machine
Four open models cover the same job without a subscription, and the licences differ more than the marketing does.
Microsoft’s TRELLIS ships under a plain MIT licence, takes image input, lists meshes among its output representations, and exports GLB in its own example code. It is not a model my Mac can run. Its repository states plainly: “An NVIDIA GPU with at least 16GB of memory is necessary. The code has been verified on NVIDIA A100 and A6000 GPUs.”
Tencent’s Hunyuan3D 2.1 is a two-model system — a 3.3-billion-parameter shape model and a 2-billion-parameter texture model — with physically based rendering textures and released weights. It is also the heaviest. Its repository states “10 GB VRAM for shape generation, 21GB for texture generation and 29GB for shape and texture generation in total” — VRAM being the memory on the graphics card itself. Its licence is not open source in the usual sense. It excludes the European Union, the United Kingdom and South Korea, and it requires a separate Tencent licence above one million monthly active users.
Stability AI’s Stable Fast 3D is the one that speaks to my hardware. It reconstructs a mesh from a single image into a GLB and takes “about 6GB VRAM for a single image input”. It also ships an experimental Apple-silicon path through MPS, Apple’s Metal Performance Shaders backend: “MPS backend support was tested on M1 max 64GB”. The same README is honest about the cost — MPS “consumes more memory compared to the CUDA PyTorch backend”, and the authors recommend the CPU version below 32 GB of unified memory. Its Community License is free for research, non-commercial and limited commercial use below one million US dollars of annual revenue, with registration required for commercial use.
TripoSR, built by Tripo AI with Stability AI, is the lightweight option: MIT-licensed, about 6 GB of VRAM, and reported by its authors at “less than 0.5 seconds on an NVIDIA A100”. That is datacentre hardware, so treat the number as a ceiling rather than a promise for a laptop.
One caution about the third-party pages you will meet while shopping. RapidDirect’s roundup, read the same day, lists a TRELLIS 2 as Apache 2.0 needing a 24 GB GPU, while the repository I linked above says MIT and 16 GB. The two may not even describe the same artifact, since that roundup names a version the repository does not. My editorial policy for this article is simple: when a roundup and a repository disagree, I quote the repository.
Why “generated” is not “printable”
Most AI-generated meshes are not print-ready as they come out. 3DPrinting.com states it flatly: “Most AI meshes are not watertight out of the box.” Asked whether AI output needs cleanup before printing, the same page answers “almost always, yes”. It explains why. The models are optimised for how a mesh looks when rendered, so output tends toward “high or uneven polygon counts, thin or zero-thickness shells, surface noise, arbitrary scale, and no flat base”. A renderer does not care about any of that. A slicer cares about all of it.
Tripo’s print guide lists what “watertight” means at a desk printer. It wants a closed shell and a “connected structure without random sprue crumbs floating as separate objects you never meant to print”. It also wants “thickness the machine can produce under your nozzle diameter or resin constraints”, plus “orientation and scale that make sense in millimeters”. Non-manifold geometry is the blocker behind that first check: the slicer cannot tell inside from outside.
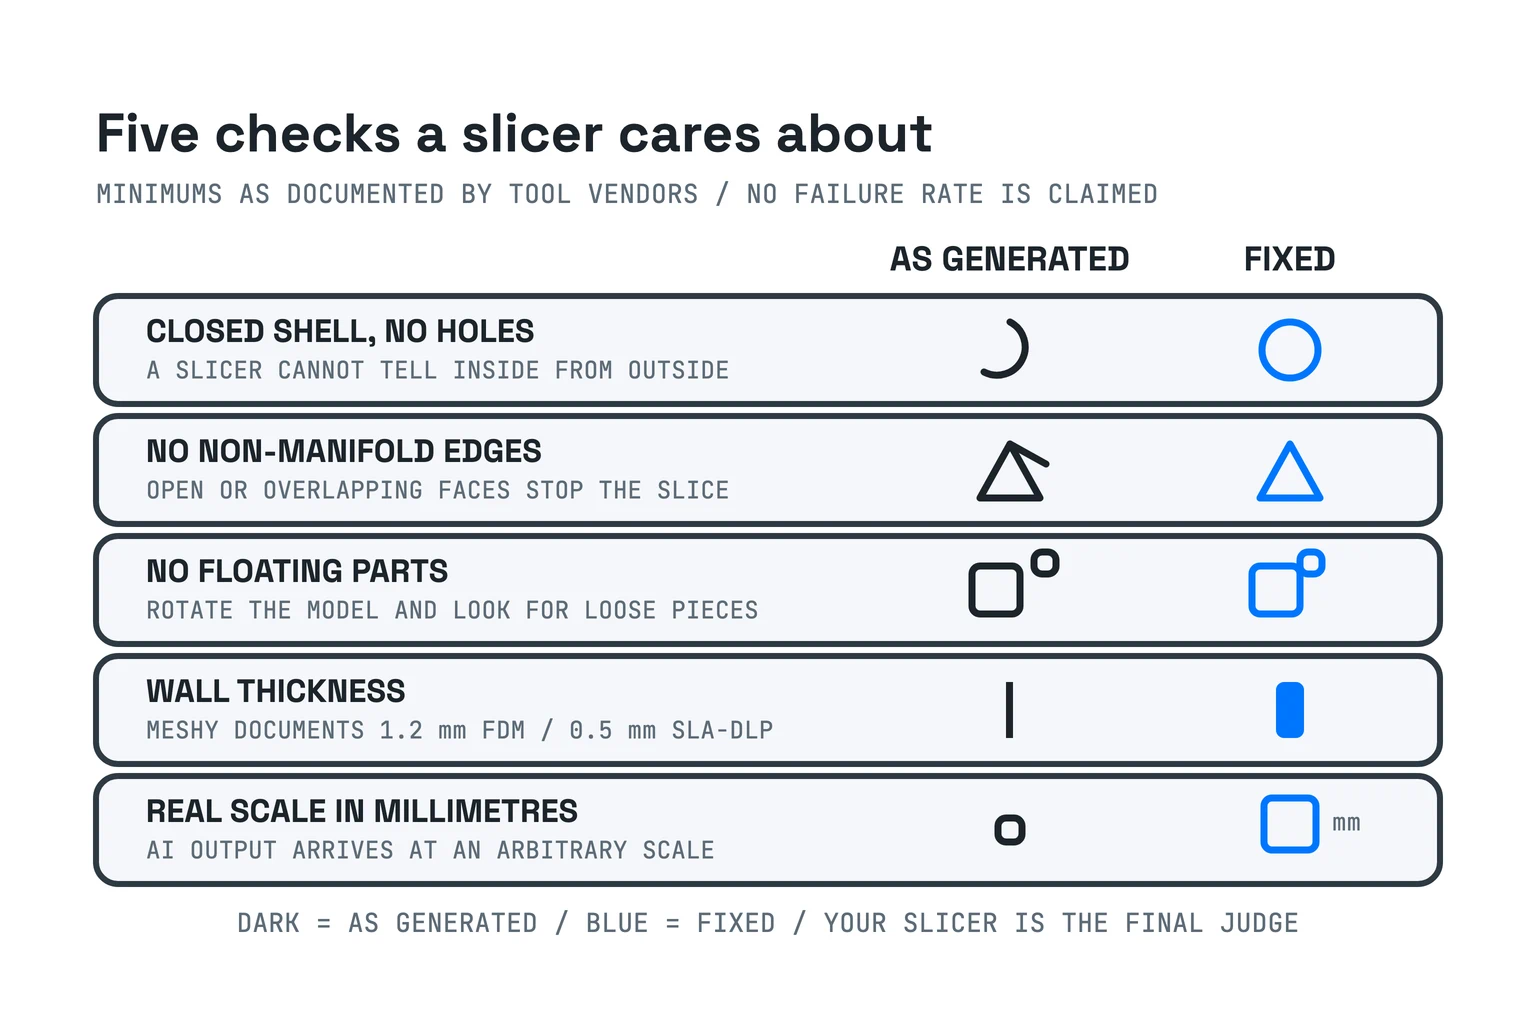
The numbers behind two of those checks come from Meshy’s documentation. It sets minimum walls of 1.2 mm for FDM, the fused-filament process, and 0.5 mm for SLA or DLP, the two resin processes that cure liquid with light. It also asks for supports on FDM overhangs beyond 45 degrees, and a base at least 3 mm thick under a figurine. Adafruit’s guide adds the inspection pass in Blender: check for holes, smooth jagged vertices, and confirm “the normals are all facing outwards so the slicing program can correctly generate a print ready file”.
Automatic repair helps at the edges only. Tripo’s guide is blunt about the limit: slicer repair is “great for small border issues” and “weak when half the torso is missing: you get a sealed wrong balloon”. The same page ends where every source ends — “your slicer remains the final judge”.
Three ways to actually print it
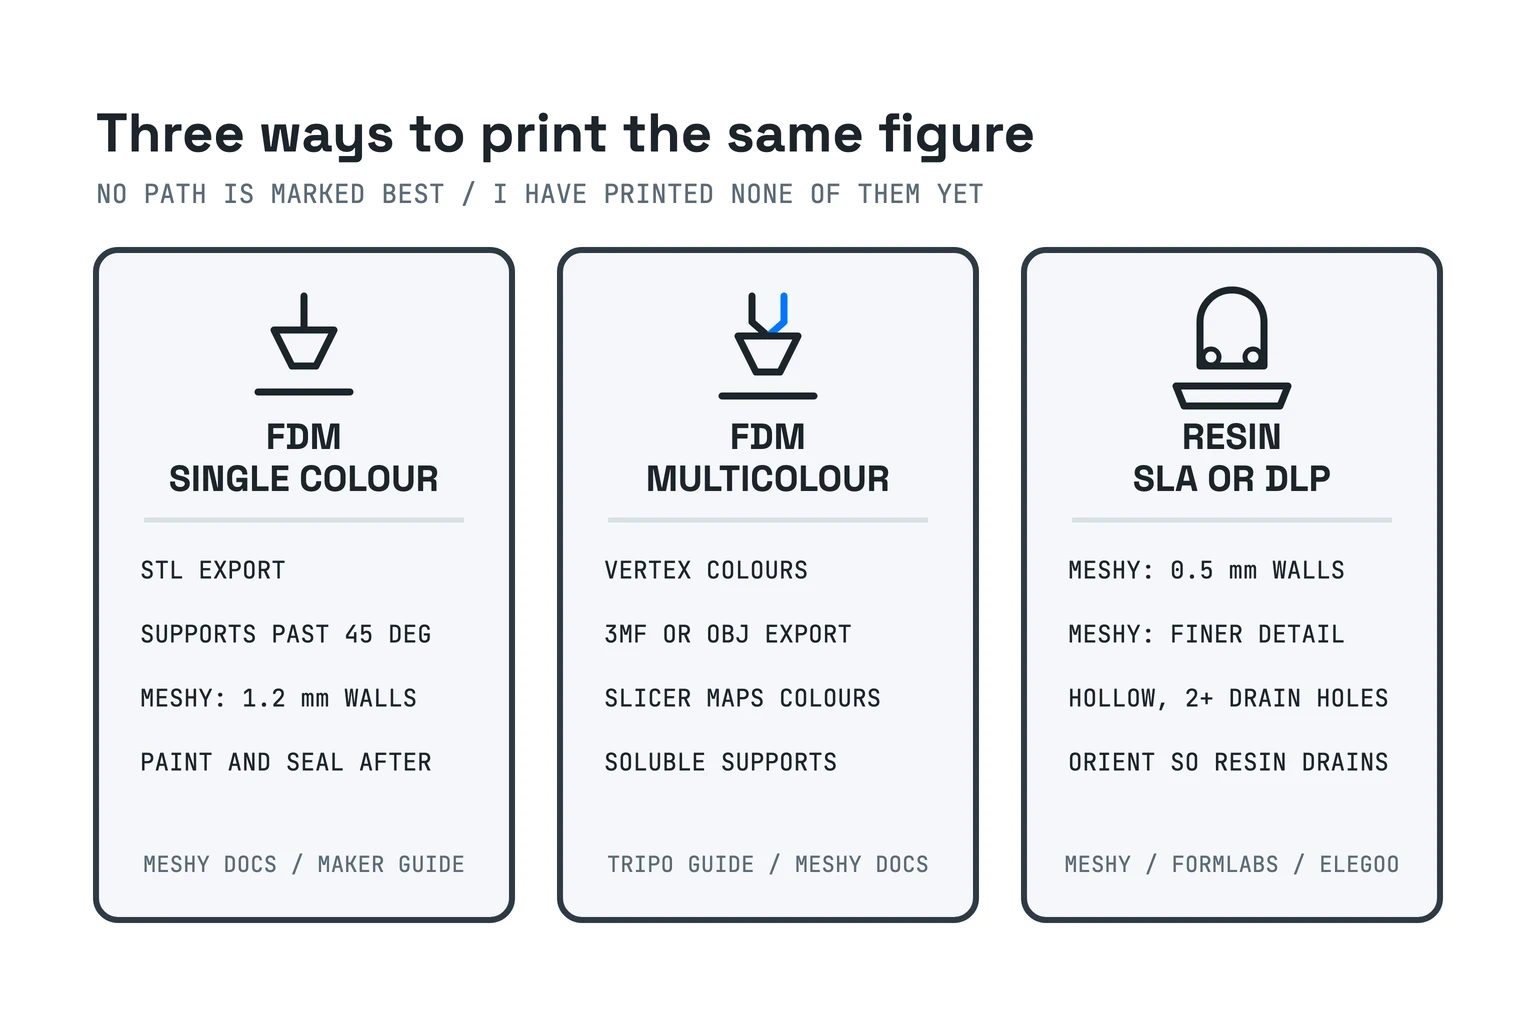
The file you export decides the print path, and Meshy’s documentation states the rule: STL for single-colour printing, 3MF for colour or multi-material printing.
Single-colour FDM is the shortest path. Export STL, let the slicer add supports past 45 degrees, keep walls at 1.2 mm or more, and paint afterwards. Whichever FDM route you take, Tripo’s guide recommends splitting large overhanging parts such as suspended arms before printing. A practitioner walkthrough suggests printing in white, painting with acrylics, printing accessories separately, and sealing “with a matte or gloss coat for durability”.
Multicolour FDM moves the colour work into the file. Tripo’s FDM printing guide exports vertex colours — its own multi-colour route writes an OBJ with “Export Vertex Colors” checked — and then “Bambu Studio will automatically recognize and map the colors upon import”. The same guide warns that skipping retopology, the rebuild of a mesh into even faces, means “importing it directly into Bambu Studio has a high chance of triggering slicing errors”. On a multi-material machine it also suggests water-soluble or easy-to-remove support filament for difficult models.
Resin buys face detail and adds a step. Meshy’s table allows 0.5 mm walls on SLA or DLP and calls that process “better for fine details”. Formlabs, a resin-printer vendor, explains what hollowing costs. Hollow parts save material and need fewer supports. But a hollow SLA print “could trap resin inside the print”, so the model needs an orientation and drain holes that let resin flow out. ELEGOO’s beginner guide puts a number on it: “it is necessary to add at least 2 holes on hollowed models”. Tripo’s advice for a first attempt is simpler — print solid until you know the drain and pressure rules.
The checklist I will follow
This is the plan for my wife’s figurine, not a result. It is assembled from the steps the sources above agree on.
- Regenerate the image until every limb is visible. Hidden geometry cannot be reconstructed.
- Run one hosted free tier and one local model on the same image. Free tiers are metered and non-commercial, so read the licence before printing anything I intend to give away.
- Rotate the mesh and look for loose pieces. Floating parts are the defect an inspection catches in seconds.
- Make it manifold in Blender. 3DPrinting.com calls “Make Manifold”, plus a check for non-manifold edges, holes and thin walls, “the single most important step”.
- Remesh and decimate. Even polygon density, and a file the slicer is not fighting.
- Add a flat base and thicken thin connections. AI output rarely arrives with a base, and thin ankles break mid-print.
- Set real millimetres, then read the slicer’s thin-wall report. Scale is arbitrary until I set it.
- Choose the path last. Single-colour FDM for the first attempt, because paint is reversible and a failed multicolour file is not.
What I still don’t know
What this article did establish is a map: which tools take one image to a mesh, what each one exports, which licences and machines they demand, the five checks that stand between a generated mesh and a sliceable one, and the STL-versus-3MF rule that decides the print path. What it did not establish is anything about my own print. Nothing here is measured by me. I have not printed the figurine, I ran none of these tools, and I cannot tell you whether the face survives at figurine scale on my printer — that is the next experiment, not this article’s result.
Three specific unknowns are worth naming. First, the vendor numbers above are self-reported and the two most striking ones come from companies describing their own products or their rivals. Second, the licences move: two of the pages I read disagree with the repositories they describe, and pricing changed between sources on the same day. Third, my own machine is an Apple-silicon Mac, so of the four open models only one documents a path that runs on it at all, and its authors call that path experimental.
Here is the question I would rather you answer than me: which single photo will you run through one free tier this week? When you have the mesh, the interesting work starts, and the rest of the lab notes are in the blog index.
Sources
- Adafruit Learning System, “AI 3D Printed Figure — Generate” (undated page, read 2026-08-25): https://learn.adafruit.com/ai-figure/generate
- Bill Hartzer, “How to Create a ChatGPT Action Figure: From Prompt to Plastic” (published 2025-04-11, read 2026-08-25): https://www.billhartzer.com/ai/how-to-create-a-chatgpt-action-figure-from-prompt-to-plastic/
- Meshy documentation, “3D Printing Workflow: From AI Model to Print” (vendor documentation, undated page, read 2026-08-25): https://docs.meshy.ai/en/webapp/guides/use-cases/3d-printing
- Meshy blog, “Best AI Tools for 3D Printing in 2026” (vendor testing itself against rivals, undated page, read 2026-08-25): https://www.meshy.ai/blog/best-ai-tools-for-3d-printing
- 3DPrinting.com, “Best AI 3D Model Generators for 3D Printing (2026)” (third-party roundup with affiliate links; published 2026-05-24, modified 2026-08-19, read 2026-08-25): https://3dprinting.com/software-guides/ai-3d-model-generators/
- Tripo blog, “6 Best Meshy Alternatives for AI 3D Generation (2026)” (vendor comparing itself with rivals, undated page, read 2026-08-25): https://www.tripo3d.ai/blog/meshy-alternative
- Tripo blog, “How do I make an AI-generated mesh print-ready and watertight?” (vendor guidance, undated page, read 2026-08-25): https://www.tripo3d.ai/blog/print-ready-watertight-mesh
- Tripo blog, “Tripo × FDM 3D Printing Guide” (vendor tutorial, undated page, read 2026-08-25): https://www.tripo3d.ai/blog/tripo-fdm-3d-printing-guide
- Cinevva, “Best AI 3D Model Generators in 2026” (guide published by a company selling a competing hosted generator, undated page, read 2026-08-25): https://app.cinevva.com/guides/ai-3d-model-generators
- RapidDirect, “8 Best AI 3D Model Generators in 2026” (vendor blog ranking its own tool first; published 2026-05-13, modified 2026-07-21, read 2026-08-25): https://www.rapiddirect.com/blog/best-8-ai-3d-model-generators/
- Microsoft, TRELLIS repository, MIT licence (repository README read 2026-08-25): https://github.com/microsoft/TRELLIS
- Tencent Hunyuan, Hunyuan3D 2.1 repository (repository README read 2026-08-25): https://github.com/tencent-hunyuan/hunyuan3d-2.1
- Tencent Hunyuan 3D 2.1 Community License (licence text read 2026-08-25): https://raw.githubusercontent.com/Tencent-Hunyuan/Hunyuan3D-2.1/main/LICENSE
- Stability AI, Stable Fast 3D repository (repository README read 2026-08-25): https://github.com/Stability-AI/stable-fast-3d
- Stability AI Community License (licence text read 2026-08-25): https://raw.githubusercontent.com/Stability-AI/stable-fast-3d/main/LICENSE.md
- Tripo AI and Stability AI, TripoSR repository, MIT licence (repository README read 2026-08-25): https://github.com/VAST-AI-Research/TripoSR
- Formlabs, “How to Hollow Out 3D Models With Meshmixer & PreForm” (resin-printer vendor guidance, undated page, read 2026-08-25): https://formlabs.com/blog/how-to-hollow-out-3d-models/
- ELEGOO, “How to Do Resin 3D Printing — Beginner’s Guide” (resin-printer vendor guidance, undated page, read 2026-08-25): https://www.elegoo.com/blogs/3d-printer-user-guide/how-to-do-resin-3d-printing-beginners-guide